

The last step before circulating your form is to Password Protect it. You do this so that other people can fill out your form, but they can’t change it. If you’ve been following along this week, you now have experience Turning on the Developer Tab in Word 2013, Creating a Simple Table in Word 2013, and Adding Form Fields in Microsoft Word 2013. You can always revisit any one of those tips. You can also download the file used in today’s tip.
Add Filling In Form protection to your document
- Click the Developer tab if it not already selected.
- Click the Restrict Editing button in the Protect group.
- You’ll see the Restrict Editing panel swing out from the right.
- Place a checkmark beside Allow only this type of editing in the document.
- Click the dropdown beside No changes (Read Only) and choose Filling in Forms.
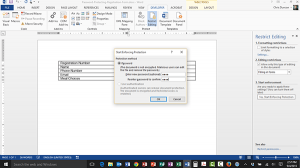
- Click the Yes, Start Enforcing Protection button.
- Enter your password in both fields. (Be certain you can remember this for later. There is NO Password Recovery in Microsoft Word documents.)
- Click OK.
Test your form out!
Removing Password Protection from your form
- Click the Developer tab.
- Click the Restrict Editing button in the Protect group.
- Click Stop Protection in the Restrict Editing pane.
- Enter your password and click OK.
