

Tables are great ways to hold and display data in Microsoft Word 2013. There are special tools built into the program that make it easy, and if you understand tables in Word, you’ll be able to apply that same information to Tables in PowerPoint and Excel.
Caution: tables should only be used to hold and display data. Do NOT use tables to manage the layout of your document. Doing so can cause a lot or problems for people who use assistive technology to read and understand your document.
Three Easy Steps to Create a Table in Word 2013
- Click on the Insert tab.
- Click on the Table button in the Tables group.
- Use your mouse to hover over the grid of boxes, and thus choose the layout of your table. For this example, I will make a table that is two columns wide by 5 rows tall. As soon as I click on the square, Word will create my table.
Now that you’ve made a table…
Now that you’ve made the table, it’s time to get started exploring it. Notice first that you’ve got two extra tabs in the Ribbon: Table Tools Design and Table Tools Layout. Also, there are two new buttons on screen. At the upper left is the Table Select button, and in the lower right is the Table Resize button.
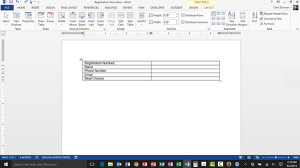
Your mouse should already be in the first cell, so let’s add some text to the table. We’re going to use this table to hold a form, so let’s type in the text we need to collect:
Type the following field names in the left-hand column:
- Registration Number,
- Name,
- Phone Number,
- Email, and
- Meal Choices.
We’ll be using this document in our next tip, Adding Form Fields in Microsoft Word 2013, so I’ll save the document for use tomorrow.
