

Adding Form Fields in Microsoft Word 2013
We created a table in yesterday’s tip Creating a Simple Table in Word 2013 and we’ll be using that same document to create our form today. You can download the file, or create it yourself following the previously published tip.
Today’s tip is also going to involve turning on the Developer Tab. Check out Turning on the Developer Tab in Word 2013 if you’re not familiar with that skill and the Developer Tab is not listed in the Ribbon.
Creating a Form in Word 2013 is Easy
- Now that you’ve got the table open and the Developer tab selected, it’s pretty easy to add fields to hold your form content.
- Click your mouse in the empty table cell beside Registration Number.
- Click the Developer tab.
- Click the Rich Text Content Control in the Controls group.
- Now repeat steps 1 – 3 in the next four table cells.
Changing Form Field Properties
Unfortunately, creating forms is not a wham-bam type of business. Don’t rush ahead and think you’re done. There are two more important things we need to do to each form field: give each one a name and title plus make sure that users cannot accidentally delete the form field.
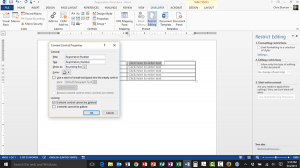
- Click on the first form field
- Click on the Properties button in the Controls group on the Developer tab.
- Enter Registration Number in the Title field of the Content Controls Properties dialog box.
- Enter Registration_Number in the Tag field of the Content Controls Properties dialog box. (Although we won’t go into it today, there are some applications where you don’t want any spaces in your form tags.)
- Place a checkmark beside Content control cannot be deleted.
- Click OK.
- Repeat steps 1 – 6 for each form field.
