

 We hear about security breaches and data hacks all of the time. Isn’t it nice to know that you’ve got a very secure way to protect your files built right into Microsoft Excel, PowerPoint and Word?
One caution needs to be stated up front: there is no Lost Password feature for encrypted documents in Office programs. If you encrypt a document with a password and then forget the password, you won’t have any choice but to recreate the entire document. Be certain you choose a memorable password!
To encrypt a document with a password:
- Click the File tab.
- Be certain you are on the Info button.
- Click the Protect Workbook button.
- Choose Encrypt with Password from the dropdown.
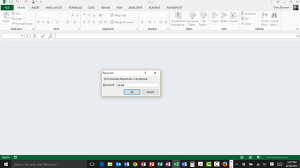
- Type your password into the field, and take heed of the warning notice before you click OK.
- Re-enter your password and click OK.
- Observe that the Protect Workbook section has a yellow border behind it.
- Click the Save button.
Testing your password:
- Close the document you just gave a password.
- Click the File tab.
- Choose Open on the left side and double-click the name of the document you just saved at the top of the Recent Documents list.
- Try typing in a wrong password to see the results you get.
- Try typing in the correct password and review the results.
My document has a password: now what?
Now that your document has a password applied to it, only people who have the password can view the contents. Be careful who you give the password to. This becomes especially important if you are worried about the contents leaking. Because the only person who can take password encryption off a document is someone who knows the password.
To remove password encryption:
- With the encrypted document open, go to the File tab.
- Click the Protect Workbook button.
- Choose Encrypt with Password from the dropdown. (Yes, just like when you added the password.)
- You’ll see dots representing the current password. Select them and delete them, then click OK.
- That’s it, no more password!
Remember to try these exercises for yourself, and spend some time thinking about password security in your office. A little forethought now can save you a lot of pain later.
