It’s likely that you’ve had to sit through a boring presentation that was just one bullet list after another, unless you’re (1) very young, (2) very old, or (3) very, very lucky. Count your lucky stars if you’re one of the fortunate three.
Now that it’s your turn in the spotlight, how do you keep from boring your audience to tears? We can start off by recognizing one important fact: if you put all of your bullet points on screen at one time your audience will finish reading them all long before you’ve finished talking about the first one. Even worse, they weren’t paying complete attention while they were reading, so you may have failed to get some important facts across.
Animating your bullet points on-screen is a great way to keep your audience engaged while you make the presentation. And it’s easy!
How to Animate a Bullet List
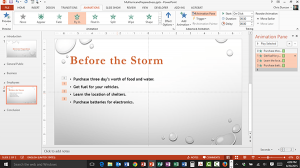
- As you can see on screen in the video, this example uses a bullet list with four items. To get started, all you have to do is:
- Click anywhere in the text.
- Go to the Animations tab.
- Click the More button beside the list of animations in the Animation group. Observe how PowerPoint divides animations into four types: Entrance, Emphasis, Exit and Motion Path. (Depending on the size of your screen, you may have to scroll down to see the Motion Path settings.)
- Click the Fly In animation and look at the Preview of the effect.
Shortcuts for viewing your presentation
To see how your presentation will appear on screen, just press the function key F5. That will start your slideshow from the beginning.
In my video I’ll press the Spacebar key to move the slideshow forward, and then each time I press the Spacebar one more bullet will come on screen.
Press Esc to go back and work in PowerPoint.
That’s good, but how about great?
You may have noticed that I had to press Spacebar an extra time after we got to the slide in order to make the animation of the first bullet occur. In the next steps we’ll change the animation so that the first bullet automatically comes on-screen as soon as the slide loads.
- Click anywhere in the text.
- Go to the Animations tab.
- Click the Animation Pane button in the Advanced Animation group.
- Click the double-chevrons in the Animation Pane to expand the animation. Observe that each bullet has a number beside it in the slide as well as on the pane.
- Click the first bullet in the Animation Pane (this will deselect the other three bullets).
- Click the dropdown arrow beside the first bullet.
- Choose Start with Previous from the dropdown.
- Press F5 to load the show, then press Spacebar to move forward into your show..
- Observe how the first bullet comes on screen, and then press the Spacebar three times to animate each of the subsequent bullets.
That’s it for today folks. Have a great day!


