

 The need to break one column into multiple columns is one that every Excel user needs upon occasion. In the accompanying example, you can see that both the first and the last names are combined into one column. If I was handed this worksheet, the first thing I would want to do is break the two names into separate columns.
Back in “days of yore” this would entail hours of Cutting and Pasting. Thanks to a feature in Excel called Text to Columns, however, you can be done in just seconds. One warning: you need to be certain that you have blank cells to the right of your data for the new information to drop into. This process does not insert new cells into your worksheet.
The Text to Columns Button
- Select the cells on which you want to run the command.
- Change to the Data tab.
- Click the Text to Columns button in the Data Tools group.
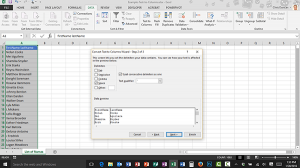
- In the Convert Text to Columns Wizard:
- Choose how the text is divided. Most data is delimited, meaning there is a text character the computer can look for to determine where to make a break. In our example, the Space character is the delimiter.
- Click Next.
- Uncheck any incorrect delimiters.
- Click beside Space.
- Observe how the list of names is now divided by a thin line indicating where the new cells will start. Also note that the Treat consecutive delimiters as one is automatically checked.
- Click Next.
- Make any changes you need to the data format for the columns.
- Click Finish.
Ta da! You’re done and can move on to the next chore. The real secret to making this work lies in the delimiter, and knowing how Excel can tell where to make the column break.
Other common delimiters are the Tab, Comma and Semi-Colon; you can always use the Other checkbox and input any delimiter you want based on your data.
Feel free to download the sample file and play around with this interesting technique.
