 Yesterday’s tip was about how to split the screen in Microsoft Windows, and view two documents side-by-side. Today’s tip is a more detailed look at a similar ability that is particular to Microsoft Excel.
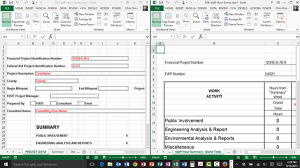
The setup is this: there are times in more complex Microsoft Excel documents when you want to view two worksheets from the same workbook on screen at the same time. In the video you’ll note that I have many worksheets listed across the bottom of the screen. The workbook is called PDE-Staff-Hour-Form.xlsx, and my work requires me to compare the Project Data worksheet with the Staff Hour Summary – Grand Total worksheet.
The trick to seeing both worksheets on-screen side-by-side:
 Go to the View tab, click on New Window in the Window group. Take a moment and observe how “:2” has been appended to the end of the document name in the title bar. If you hover over the Excel icon at the bottom of the screen you can see where there are now two versions of the workbook, one that ends in :1 and the one that ends in :2 that is on your screen now.
- Click the Staff Hour Summary—Grand Total Worksheet to change to it.
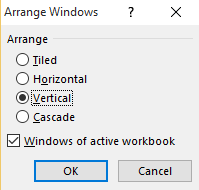
- Go to the View tab and click on Arrange All in the Window group.
- Be certain that Vertical is selected, and that a checkmark appears beside Windows of active workbook.
- Click OK.
The important point to remember is that you only have one document open on-screen. Any changes you make on the left side will appear on the right side, and vice-versa.
To show you what I mean, I can type a number in cell A1 on the right side, and that same value will be in that cell when I switch to the same worksheet on the right.
Similarly, anything I delete on one side is deleted from both sides.
To get your screen to return to its normal appearance:
- Close one side (it doesn’t matter which one).
- Maximize the remaining window to fill the screen.
I hope this helps you work a little bit easier today. I always look forward to hearing from you about this or any other tip I post.


