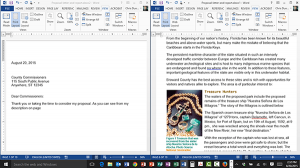
Well, you may have noticed that just a couple of days ago I had a tip about how to view two worksheets from the same workbook side-by-side in Excel, and today’s tip is about how to do the same thing in Word. What gives you ask?
There are lots of times when I need to compare one part of a document with another. If I can spare myself the trouble of scrolling back and forth, I can focus on doing my job, work more proficiently, and even enjoy what I do for a living.
In this example I am writing a cover letter that will be the first page of a report I am writing to request the County Commission create a park for scuba divers. As any good cover letter would, I want to address certain issues from the report in my letter. How can I find the information without having to scroll back and forth a hundred times?
Follow these easy steps to split your screen in a Microsoft Word document:
- Be certain no other Word documents are open.
- Change to the View tab.
- Click the New Window button in the Window Group.
- Observe the way “:2” was appended to the name of your document in the title bar. As further confirmation of what happened, hover your mouse over the Microsoft Word icon at the bottom of the window and observe that you now have two windows open with the same name.
- Change to the View tab.
- Click the Arrange All button in the Window Group. Word will automatically stack the two documents on top of each other.
- Click the View Side by Side button in the Window group if you prefer to view them side-by-side.
Scrolling in Lock Step
When you start to scroll, you may notice that the two documents are scrolling together. This is because a feature called Synchronous Scrolling is turned on. Notice also that the Ribbon has changed its appearance to make room for the buttons in half the space.
The Synchronous Scrolling button is located in the Window Group of the View tab. Click it one time to turn it off. (It doesn’t matter which side you do this on, it will apply to both windows.)
As always, please feel free to leave feedback in the comments section. I look forward to showing you the next tip in the series.


