 Even for a nerd like me, I have to say this is not one of the sexiest blog posts I’ve put out there. But when I get bitten by a new feature of a program I like to let you know about it in case the same thing happens to you.
Outlook 2013 and 2016 have changed how they are dealing with IMAP accounts. For those of us who don’t want to spend the money on an Exchange account, and need more than the basic POP3 account can give us, this is very good news. One of the changes, however, really blocked me when I was working on a new manual for Microsoft Outlook.
The goal was simple — to add, and then delete a Calendar. It always worked before, and all of the buttons were in the right place. But when I clicked the buttons… nothing happened. I mean, literally, nothing happened. Two hours on the phone with Microsoft support got me nowhere, but I was able to dig up the answer by doing some Google searching.
Thanks to a great article by Diane Poremsky titled What you need to know about IMAP Accounts in Outlook 2013/2016, I fixed my problems in just minutes.
 How do you know if you need to worry about this?
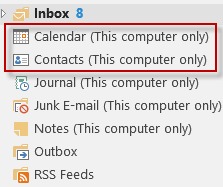
Take a look at your Folder List next time you are in Outlook and compare it to the image I grabbed off of Diane’s article. Does your Folder List say (This Computer Only) beside Calendars and Contacts? If it does, then you need to make this fix.
Basically what happened is that the engineers at Microsoft changed the data file type for IMAP email accounts from .pst to .ost. It may be good for Outlook, but it’s not really good for you if you have multiple IMAP accounts like I do. The solution is pretty simple, just create a local .pst file, and delete the .ost file.
Steps to Create a Local .pst File
- Go the File tab.
- Click on the Info button, then click Account Settings
- Choose Account Settings from the dropdown.
- Click on the Data Files tab.
- Click Add.
- Choose Outlook data file (.pst) if offered the choice, then click on OK.
- Type the name of your new .pst file file in the dialog box, then click OK.
- Choose the new data file in the list, then click the Set As Default button.
- Close Outlook, and then re-open the program.
Move the Data from the old file to the New
You will need to move any content from Contacts (This Computer only), Calendar (This Computer Only), Tasks (This Computer Only) or Notes (This Computer Only) to the new data file. The steps to do that include:
- Switch to the Folder that contains data (such as Calendar(This Computer Only)).
- Click the View Tab.
- Click the Change View button.
- Choose List View from the dropdown.
- Select All and move the items to the new folder in the new data file.
Remove the Old Data File from the Computer
- Go the File tab.
- Click on the Info button, then click Account Settings
- Choose Account Settings from the dropdown.
- Click on the Data Files tab.
- Click the old data file name in the list.
- Click the Open File Location button. This will open Windows Explorer and show you the data file. Leave the Windows Explorer window open!
- Return to Outlook and Close the Account Settings dialog box.
- Quit the program.
- Create a backup of the file (on the Desktop for example), and compress it for safe keeping.
- Delete the original data file in Windows Explorer (move it to the Recycle Bin).
- Restart the program.
And there you go! Another computer problem solved… once you know what to do about it. If you would like to see the images that go along with these instructions, please read Diane’s complete article.


 How do you know if you need to worry about this?