

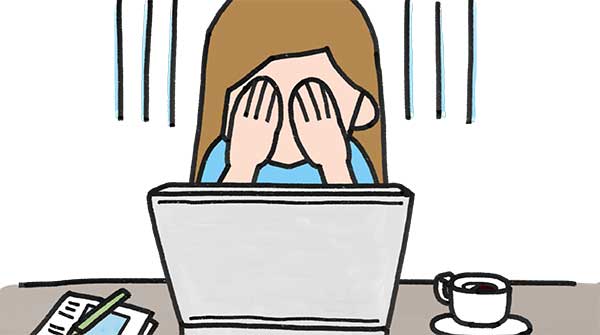
As I’ve taught people how to use Microsoft Outlook over the years, I’m constantly amazed by the number of people who report physical symptoms when checking their email. One common thread is that so many people are overwhelmed by email that they report physical symptoms when checking their email, up to and including hyperventilating.
The good news is that you can take control over Outlook, and you can whip it into shape. The goal is commonly termed Inbox Zero, and you achieve it by using all of Outlook, not just the reading pane. The steps are fairly simple and relatively easy to keep up with once you have everything established. You may have to put in some work if you already have tens of thousands of emails in your Inbox, but it can be done!
Five Simple Steps to Inbox Zero in Outlook
1. Establish a Storage System
 It’s important to have a storage system that makes sense to you. I have three main folders: 1) CDA business related; 2) Client Emails; and 3) Vendors Software. Each one of those folders contains folders, and many of those folders contain folders.
You might think I’m a little bit OCD, but that works for me. The nice thing is that it is easy to consolidate or separate emails into more folders whenever I want. The important thing is that none of my stored emails are in my Inbox.
Outlook is designed to be a system of folders. Even your Calendar is just a folder so far as Outlook is concerned.
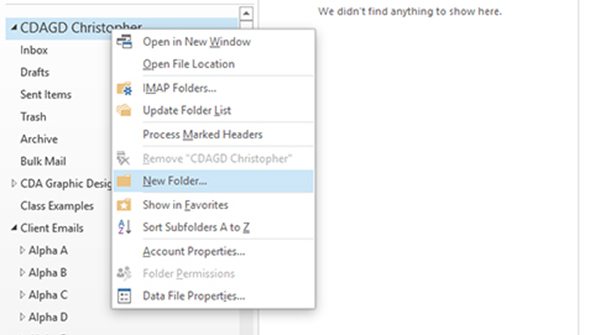
Steps to Create a Storage Folder
- Right-click on the name of your email account. (Note: not the Inbox and not any items you have in the Favorites panel.)
- Click on New Folder in the dropdown menu.
- Enter a name for the Folder, and then press Enter.
Manually Moving Emails to Storage Folders
- Click and hold on any Email in your Inbox.
- Drag it on top of the Folder where you want to store the email.
- Let go!
2. Use To-Dos and Tasks
 STOP! Before you move that email, you have to decide if there are any actions you need to take. Things you can do with an email include:
- Reply right away (takes less than 2 minutes to write and respond.) If you can take care of something quickly, then do so. After you Reply, then move on to one of the filing steps below.
- Reply later (Use a To-Do to remind you.) You can Flag a message for Follow Up using several different methods. The one I prefer is to right-click on the message and choose when to respond from the Follow Up flyout menu. After you flag the email, move on to filing it.
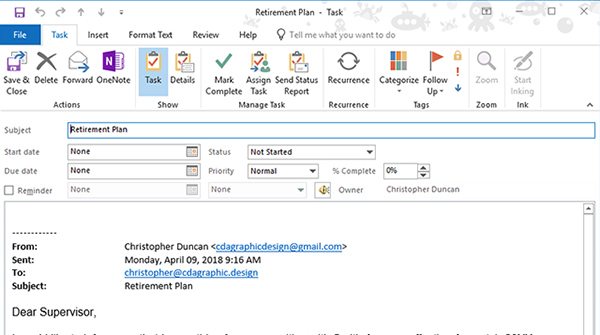
- Reply after Doing Work (Create a Task to help you manage your work) Drag the email on top of the Task pane button, set your due date and reminders, then click on Save & Close. Once your Task is created, you can file the email.
3. Set Up Quick Steps
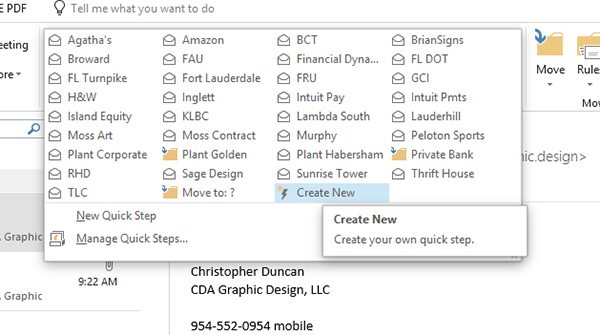 Quick Steps are a great way to get your email under control. You set up the process one time, and then just click on the email, and then click on the appropriate Quick Step. When working with Quick Steps, remember to keep an eye out for the More button in the Ribbon. The More button is the downward arrow with a line across the top, and it will reveal all of your Quick Steps.
If you create a lot of Quick Steps, remember to use the Manage Quick Steps button to keep them in a sensible order.
Create a Quick Step
- Click on an Email that the Quick Step should apply to.
- Click the Home tab > Quick Steps group > More button > Create New button.
- Enter a name for the Quick Step.
- Choose Move to folder from the Choose an Action dropdown.
- Choose the folder from the Choose folder dropdown.
- Click Finish.
Applying a Quick Step
- Click on an Email.
- Click on the Quick Step in the Home tab > Quick Steps group.
- Wave bye-bye to the email!
4. Lay down some Rules
 Whereas Quick Steps happen after you have received and presumably read an email, a Rule happens before it ever hits your Inbox. Though you have to exercise some caution that you don’t make a Rule so broad that you miss an important email, it’s a great tool to handle all of those office newsletters that we get.
Create a Rule
- Click on an Email that the Rule should apply to.
- Click the Home tab > Move group > Rules button > Create Rule from the dropdown.
- Click Advanced Options… in the Create Rule dialog box. This will open the Rules Wizard.
- Choose the conditions(s) you want to check. You can have multiple conditions.
- Click any hyperlinked/underlined words to change or set them. Once you enter a word in the Search Text dialog box, be certain to press Add before you click OK.
- Click Next at the bottom of the Rules Wizard.
- Choose the things you want to do with the message in the next window. Obvious choices include Move it to a specified folder, delete it, and/or set a reminder.
- Click any hyperlinked/underlined words to change or set them.
- Click Next at the bottom of the Rules Wizard.
- Identify any exceptions, such as from a certain person, or if it is sent only to me.
- Click any hyperlinked/underlined words to change or set them.
- Click Next at the bottom of the Rules Wizard.
- Specify a name for the Rule.
- Place check marks beside Run this rule now… and Turn on this rule….
- Click Finish.
Remember, Rules happen before the email hits your Inbox, so you shouldn’t have to run them after this.
5. Be Ruthless
It can’t be said often enough: not every email needs to be saved. If you are confident you’re not going to need to go back to an email, then for goodness’ sake go ahead and delete it. Why hang on to all of that clutter. We all love to watch Hoarders on TV, but are you an email Hoarder?
