

Styles add a lot of power to your ability to produce professional looking documents with ease. They’re not a requirement, but every power-user knows about them and uses them. I’ve shown you how to Apply Styles to Text, Use Style Sets and Revise Styles in previous Tips, but today I’m going to show you how to create your own Styles.
The thing to remember about Styles is that you are looking for a common structure, where all items of a certain type should look the same. For example, all Captions should be 8 pt. Arial, Italic and Center aligned.
In the example video you can see that I have three meetings, and I want the names of the meetings to stand out from the rest of the copy. To accomplish that I am going to create a Style named Meetings, which is going to have the following definitions:
- Font: Arial, Bold, 14 pt., Blue Accent 5
- Paragraph: Bottom Border, Space Above 24pt
Create a Style from Scratch
- Click the More button on the Home tab in the Styles group.
- Choose Create a Style from the dropdown.
- Name the Style “Meetings.”
- Click the Modify button.
- In the Create New Style from Formatting dialog box:
- Change the font to Arial.
- Change the size to 14.
- Click the Bold button.
- Click the Automatic color definition dropdown.
- Choose Blue Accent 5 from the dropdown.
- Click the Format button in the lower left corner of the dialog box.
- Choose Paragraph from the dropdown.
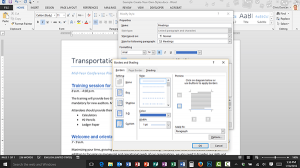
- In the Paragraph dialog box:
- Change the Spacing Before to 24 points.
- Change the Spacing After to 0 points.
- Click OK.
- Click the Format button in the lower left corner of the dialog box.
- Choose Border from the dropdown.
- Click the Automatic color definition dropdown.
- Choose Blue Accent 5 from the dropdown.
- Change the Width to 1 pt.
- Click the Bottom Border button in the Preview Panel.
- Click OK.
- Click OK to exit the Create New Style from Formatting dialog box.
- Observe the addition of the Style to the Styles list in the Ribbon.
- Click your mouse in the first meeting name.
- Click the Meeting Style to apply it to the text.
- Repeat with the other two meeting names.
Create a Style from Text you’ve already Formatted
It can be very useful to create a Style from text you’ve already styled. In the video example I have already applied text formatting to the meeting time and location line for the first meeting. I just want to convert that to a Style, and then apply that Style to the other text.
- Select the text you have already styled.
- Click the More button on the Home tab in the Styles group.
- Choose Create a Style from the dropdown.
- Name the Style “Locations.”
- Click OK.
- Click your mouse in the second meeting’s location text.
- Click the Locations Style to apply it to the text.
You can download the practice file I use in the video, or try practicing on your own documents.
